|
Let me start out by saying that I am
no expert in the methods of painting, but having roughly
28 years experience in restoring some of my own cars I thought
I might be able to add a few tips for those beginners out
there to help them avoid the same mistakes that I and many
other fellow enthusiasts have made.
(I must preface this article by saying
that there are plenty of books in the market that do this
subject justice and that the purpose of this set of articles
is not to tell you how to piant your car, but to share my
experiences painting mine. I cannot be responsible for
any work that you do on your vehicle based on my articles.)
I thought I would do this in a multi part series so as
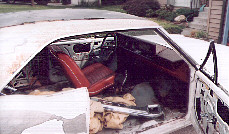
not to bore you all to death at once. I am currently in the process of restoring my
first car, a 1967 Cutlass Supreme. This car has seen many years of hard use and
probably will allow me to refresh my memory on the do's and don'ts. Since this is a
slow restoration, I will be supplementing other articles from time to time on other
subjects that you may find interesting. I will be detailing and polishing my cars in
the coming weeks and will keep you posted on some of the techniques I have found valuable.
Getting the car ready- removing the chrome
My first installment will be on what to remove or not remove to get
the car ready for paint. It is my opinion that regardless of the type of paint job,
a car should always be stripped of as much chrome and moldings as possible. Many a
fine paintjob look bad because or paint on the moldings and later lifting paint due to
poor adhesion. It also makes it much easier to buff the paint out right up to the edge
where the moldings will cover up the new paint. Otherwise, dirt could cause the
paint to eventually lift in the area's around the moldings.
First start with the bumpers and then work your way around the car
taking off everything that has external screws and attachments. This includes moldings,
emblems, tail lights and head light surrounds. Some pieces have hidden attachments behind
interior panels and may be difficult to get to. Talk to your local automotive paint
supplier for some tips on getting to those hidden attachments. They will also have
specialized tools for removing your moldings and interior parts. If you are not
doing a total restoration, removal of the window moldings, windows, and drip moldings
probably should not be attempted as it basically requires the gutting of the whole
interior, including as in my case the headliner too. Just make sure that whatever
you don't remove is well cleaned in and around the molding so that it can be tightly
masked to allow paint to flow under as much of the molding as possible. If in my
case you have rust at the bottom of the windshield and rear window as well as rust under
the vinyl top, you will need to take it all off.
Now that you have your chrome off, what
to do to the paint to get it ready.
For all of you who have waiting for
part 2 I apologize but I do the articles as I actually
do the work to my car and it has been some time since I
have had a chance to work on my car.
I hope to start back up sometime in
2006. Please check out
the books to the left to get you started.
|